Showing posts with label blow-out. Show all posts

1/06/2012

BLOW-DRYING BASICS: MY WAY

It took some trial and error to finally get a good  hair routine down for myself. I used different products, brushes & techniques before I knew what my hair needed when it came to blow drying. 
I've been meaning to post my hair care routine for a while now. I hope you guys enjoy it and maybe pick up a tip or two.
I know everyone's hair is different and I have straight/wavy thick hair. So even if you don't have my type of hair I hope you like it anyway.  I apologize for the length of this post but I wanted to let you know everything I did and used :)


11/25/2011

REVIEW: One 'n Only Argan Oil Restorative Mask


I'm calling it my new Miracle in a Bottle


What is it? 
A restorative hair mask enriched with proteins and Keratin and infused with the famous argan oil, one of the  worlds rarest oils which is derived from the Moroccan Argan Tree. This is an intense treatment that penetrates the cuticle to help reconstruct, rebuild strength and restore elasticity. It's moisturizing properties are to help revive and nourish dry and damaged hair. It also promises to improve texture, manageability and shine. 

9/21/2011

Wednesday's Beauty Tip


Beauty Tip of the Week


*THE SECRET TO A PERFECT BLOWOUT*


There’s more than one secret to a perfect blowout but there's an important one that I just recently learned about and it makes a lot of sense. Start with your fingers when your ready to start blow drying your hair. Pull your fingers through hair starting at the roots and pull hair out a few inches and hold it while you use the blow dryer to shoot air at the crown. Try to hold your hair super taut.

A brush can only get so close in so hold your hair super taut while doing this otherwise moisture will stay in the hair shaft and it will frizz up. It's very important to make sure your roots are dry first before going on to the rest of your hair.

*Another great tip is to lock in style with the “cool button” on your blow dryer. If you blow dry your hair in sections like I do, once each section is completely dry, pull hair taut with your brush and blast it with the cool button on your dryer. Finish each section like this and the cool air will lock in shine and smoothness.


Do you guys have any blow drying tips when it comes to your hair?  Please share!!!


7/18/2011

Review: Generic Version of the Paul Mitchell Super Skinny Serum


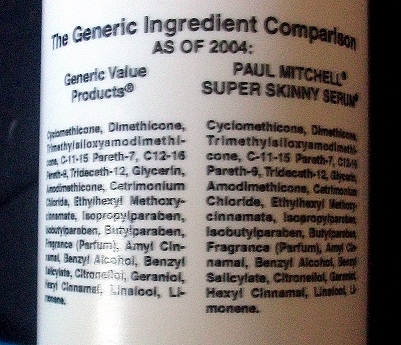
Generic Value Products is a line that makes generic versions of high end hair products. The one I'm reviewing is Paul Mitchell’s Super Skinny Serum. They have a lot of different comparisons to some great brands, to name a few, (Biology, Redken, Matrix and many more). The beauty of this is that they claim to have the same exact ingredients that Paul Mitchell's super skinny serum does. On a scale from 1 to 10 I’m giving this product a 10 and here's why:


I should tell you a a little about my hair type so this makes sense. I have very thick hair, that is now cut short layers and long layers (which has helped to thin out my hair a lot), and the length is about 2 inches past my shoulders. If I was to let my hair air dry w/o any products applied it would be fizzy, dull looking with no shine or body at all. (not a cute look for me).


I’ve tried so many different serums including Paul Mitchell’s and I was in love. I never ended up purchasing it bc it was a little on the pricy side, I want to say it was around $25 for a medium size bottle. I was determined to find something just as good with a smaller price tag.


I was at Sally’s Beauty Supply with my friend one day and she pointed this out and said it really does the same thing as Paul Mitchell's brand. Of course I was skeptical especially after seeing that it only cost $7.99. She showed me the back of the bottle where it lists all the ingredients in the generic brand and in the real brand, and they both had the same exact ingredients. So I had to give it a try.

 ( it was hard for me to get a good picture showing the back of the bottle bc of way the bottle is shaped, but if you look closely I think you can see that both brands have the same ingredients)


I came home and took a shower, applied my leave in conditioner then applied this product. *Quick Tip: The best way to apply styling products (especially serums and gels) is to put a dime size amount into your palms, rub them together then flip your head over and start at the ends of your hair and work your way up till the mid shaft. You want to take your time while doing this to make sure every strand has been coated.** I don’t apply this past the mid shaft because that will just weigh down the top leaving me with no volume. I use a root boosting spray for the roots and the crown for extra body and volume.


I was highly impressed with this product, after blow drying my hair it was frizz free, soft and shiny! I would usually make a pros and cons list but I cant really think of any cons, except if you apply too much it could make your hair look greasy but that applies to any type of hair serum. I am so happy I found this product . Seriously! It’s three times cheaper than Paul Mitchell’s skinny serum, the bottle is bigger and I got the same results that I would if I was using the more expensive brand.


I’ve had this bottle for about a year now and still have a little less than a half a bottle left, I would have more If my mom didn’t use it time from time on her hair, lol she loves it too so I’m happy to share. I’m very eager to go to Sally’s and try their other products to see if they’ll also have the same effect. I strongly recommend this for you girls that either are using Paul Mitchell’s serum but don’t want to spend as much or if you’re looking for a really good product to eliminate frizz. You wont be disappointed, trust me!!!
Suggested Retail price $7.99 at Sally’s Beauty Supply stores or if you order it from their website http://www.sallybeauty.com it’s usually cheaper
6/27/2011

The Easy Steps It Takes To Blow Dry Like A Pro


After years and years of trying to blow dry my hair like my hair stylist would, I finally learned and I actually don’t hate blow drying it anymore bc I’m happy with the results. It took lots of practice to get the techniques you need to get a great blow out down. But I promise you once you understand them and are using the correct products and tools, you to will be able to get salon like results.

I’m sure there's a lot of you that already are satisfied with the results you get but for those of you that are still struggling or want to get some extra pointers, I decided to dedicate this post solely on how to blow dry your hair to get professional results. I hope you guys enjoy and please feel free to comment or add any tips you have. xoxo!

I absolutely believe that one of the main tools that will make a difference is the blow dryer your using. With blow dryers the price is really right. They can range anywhere from $10 to some that are over $100 (those most expensive are the professional ones that salons use). It all really depends on what your personnel needs are: (i.e heat settings, attachments, wattage, etc.)  If you have short hair or don’t use a blow dryer very often, then an inexpensive dryer with fewer options will likely work for you.  When you get into the $50+ range, you are investing in a dryer that will last longer, use newer drying technologies to reduce damage on your hair, and contain more options for cater to your hair needs.  While the more expensive, salon-quality models do tend to have all the bells and whistles, you can get a good, well-equipped dryer with great features for around $40 or $60. You want an ionic blow dryer with at least 1800 watts (will reduce the drying time and are less damaging to your hair), make sure it has variable heat setting with a cool button (that button is important). It should come with a diffuser and a nozzle for smoothing the hair.

Now that I got that out of the way lets get started! After you wash your hair instead of using your regular towel try paper towels.  Take 3 or 4 sheets and wrap around your hair to get out excess wetness. If the paper towels come away soaked, do it again. Then let it air-dry as long as possible, or wrap it in an absorbent towel, such as an Aquis Hair Towel ($18, amazon.com), to remove excess water. You don’t want to start blow drying your hair until its about 70% dry and don’t bother putting in your hair products yet either, hair really wet wont take in the styling products like you want them to.

I will start pre-drying my hair with the blow dryer on a medium heat setting and massage your roots while doing this. I wouldn’t do this for more than 10 minutes, the thicker your hair is the longer you’ll want to pre dry and vise versa for thinner hair. You always want to get your roots dried first so with your fingers lift your hair away from your roots while directing the blow dryer at the roots.

Once your hair is almost dry apply your products. I have normal to dry hair so I use a leave in conditioner right after getting out of the shower. Then when its almost dry I use Paul Mitchell’s Skinny Serum ,It helps smooth out the hairs and cuts down on drying time. The trick is to make sure you coat every strand, besides the crown because that will weigh the hair down. I flip my head over, use a dime size amount in my palms, rub your palms together and start at the ends and work your way up to the mid shaft. Then comb through your hair to evenly distribute. For volume I use SauvĂ©'s Professional Root Boosting Spray, spray the roots by parting hair into 1-2 sections and continue to mist evenly through roots and mid shaft. Everyone has a different hair type so you’ll probably have to experiment with a few different products before you find the right ones for your hair. Once you do find the right mixture, it will make your life a lot easier. Smile 

I have thick hair so I like to part my hair into a lot of different sections. Like the diagram on the right shows. But if your lucky to not have as much hair as I do,  you can just do three sections, from the top, the middle and the nape.( on the diagram that would be numbers 1, 4 and 6). Leave the nape section loose because this is where you'll begin blow-drying. You might have been told to start blow drying your bangs and front section first and if it works for you go with it, but I personally have tried it both ways and prefer doing the front section last, my reason is bc I feel it’s easier to start at the bottom and work your way up because when you drop the hair down, you aren’t putting dry hair on top of wet. It’s also easier because you can see what you are doing more easily. (just my personnel preference).

As far as brushes, if you want a very straight look you can use a paddle brush but if you want a straight look with some volume use a big round brush (my favorite brush). It can be tricky to use at first but once you get it down it’s a no brainer. I used to hate using these brushes bc I didn’t know the correct way to use them but now that I do I love them. To use the round brush, take a section of hair that is about the same width as the brush. Place the hair over and around the brush. Apply the dryer and rotate the brush as you dry. The bristles work to smooth each hair as they rotate. If this seems to be too  complicated, leave out the rotation of the brush. Always point the nozzle attachment on your dryer facing down the hair shaft. This helps to flatten the cuticle for the sleekest results. Once your done with the bottom half, unclip the middle section.

You want to achieve some volume in this section.  I do that by placing the brush right under the section of hair, and then bringing the brush up. Direct the dryer flow against the hair as you lift to lock in volume, then smooth through the rest of the strand as usual.

Extra Tips: Remember when your section is dry, use the cold shot button on your hair dryer for a few seconds to set the shape

                 As you dry, turn and move the brush toward the ends of your hair.

When your done with the middle section unclip the top and you'll want to dry your bangs in a desired style, depending on the length and cut of your bangs. Typically bangs respond better when dried forward, but you will have to experiment to see what works best for your hairstyle. For me, I like to spend the most time on this section bc I want to achieve volume while framing the layers around my face.  I do that using my large round brush and blow drying the hair forward and up while over directing the hair. This creates a great deal of volume and body especially when used with a volumizing mouse or spray.

Before you put away the blow dryer, feel with your hands that you haven’t missed any areas that are damp. You might want to go over you bangs again with either the blow dyer or a flat iron to achieve your desired style. After your hair is dry to the touch, give it a blast of cool air to set the style in place. Finally, massage a pea-size amount of smoothing serum (or styling cream) into the ends to flatten fly aways, and pat the top of your head with your hands so that any residual serum will level shorter, broken hairs that tend to stand up around the crown.

So that’s it, I hope this was somewhat helpful and not confusing. Let me know loves xoxo

Related Posts Plugin for WordPress, Blogger...