Showing posts with label nail art. Show all posts

5/03/2013

ABC Nail Challenge: Q is for Queen of Beauty

Hey Everyone! So we're already on the letter Q in the ABC Nail Challenge I've been participating in. I can't believe we only have 9 weeks (letters) left of this challenge, I don't want it to end! Anyway for this week I used Queen of Beauty by Sinful Colors.

sinful colors

I knew the letter Q was going to be a challenge, at least for me anyway. I don't know of any nail art associated with Q and I'm not that creative too come up with something else. So I looked through my collection and found only one color that began with Q. Queen of Beauty  is a silver glitter topcoat. I call it a topcoat because the glitter is pretty sparse but you can use it alone like I did on my accent nail, it just takes a few coats.

glitter nail art

I thought this color would look nice with a really pale pink so I used one of those pinks that come in a french manicure set. Normally you would only use one coat if you were going for the traditional french mani but I used 3 to make it more opaque. Then I used NYC Matte Me Crazy over the pink, I thought the matte finish might give a nice contrast since the glitter is so shiny. I know it's hard to see in the pictures.

nail art

As you can see I used Queen of Beauty on the tips except for my accent nail, that is 3 coats of just Queen of Beauty.  Instead of using the brush from the bottle I used a flat nail art brush and I think it helped in spreading the glitter evenly. You guys know how this kind of glitter is hard to work with sometimes.  

glitter nail art

nail art

Unfortunately this mani only lasted 4 hours because the pink polish started to chip and dent. That's the one thing I don't like about using matte top coats, they don't last as long. They need to come out with a matte no-chip top coat, that would be genius! I'm going to go check out what everyone else did this week :)


Click the links below :)

4/26/2013

ABC Nail Challenge: P is for Polka Dots!

This week for the ABC Nail Challenge I choose polka dots for the letter P. I know, it's not too original but there are so many different looks you can create with a few dotting tools.

polka dot nail art

Going along with the "P" theme I used Scandal  by Sinful Colors (one of my favorite pinks) and Popular by Revlon on my accent nail. You can't really tell in the picture but Popular has both silver micro and hex glitter which makes this such a pretty color. I know a lot of other beauty bloggers love it too.

polka-dot-4

I didn't have a set look I wanted to achieve so I just began dotting small and large dots on the sides of my nails. I didn't want to do the usual straight dots across, I wanted something a little different.

polka-dot-2

polka-dot-5

I haven't done a polka dot mani in a long time so it was fun and I like how they turned out. What are your thoughts on polka dot nails, do you like them or no?

Click the links below :)

4/17/2013

ABC Nail Challenge: O is for Ombre

Hey everyone! We're on the letter O in the ABC Nail Challenge this week, (already)!  This week has been a crazy one for me, so much that I knew I wouldn't have time to do my nails or at least with the effort I would want. I remembered an ombre manicure I did recently and figured I would post those pictures instead of skipping out totally this week.

ombre nail art

Savage and Scandal by Sinful Colors are such pretty colors alone and I really like how they look together. The more I look at these pictures they remind me of the summer, the beach and cotton candy!

gradient nail art

ombre nail art

This was my first go at ombre nail art so I played it safe with two colors but I want to try it again soon with three or four. It's a fun look and easy to do even though it was more of last years trend, I don't care. I'm looking forward to next week and coming up with something fun for the letter P. You should definitely check out the looks from the other participants in this challenge :)

Click the links below :)

4/04/2013

ABC Nail Challenge: M is for Matte

Another ABC Nail Challenge post! I cant believe we're on the letter M already, that just shows how fast the weeks fly by. I really didn't have to think too hard when it came to what I wanted to do. I go through stages where I'm really into the matte finish and I just happen to be in that stage now so it was perfect.


Instead of using the usual black, I used a charcoal grey, it's actually one of Sally Hansen's Magnetic Polishes in Graphite Gravity. Of course I didn't use the magnet even though this is a good magnetic polish. Then I used NYC Matte Me Crazy topcoat. I just recently picked this up for a few dollars at Walmart and it works really well.


I used a silver polish to make dots around the sides of the nails. I've had these little packets of different color nail glitter that I found and decided to throw some of the silver glitter on my accent nail for fun.


I didn't have time to do my nails yesterday after work so I literally just did them and I'm pleased with how they came out. So now I'm gonna go paint my other hand!! There's been a few times in this challenge where I wasn't happy with my nails so I wouldn't even bother doing my other hand. Am I the only one who does that?


Are you a fan of the matte finish or matte polish?


Click the links below :)

3/28/2013

ABC Nail Challenge: L is for Leopard

This week we're on the letter L for the ABC Nail Challenge hosted by Kimber over at
Kimber's Lacquer Korner. If you like nail polish and nail art you should really check her out then, she has a lot of amazing looks!

Anyway, this week was a lot easier on me than last week's Hello Kitty disaster! There were more choices this week. I had a few polishes that began with L but none that I was crazy about using, so I chose a leopard print mani. Leopard print is always fun and besides it's been a while since I did one.


Instead of the traditional golden leopard colors I picked a brighter combo, blue and silver. I used Celeb City by Sally Hansens Xtreme Wear and Savage by Sinful Colors. They look a bit sloppy up close but they're not supposed to be perfect so it's okay. I always used a dotting tool for the nail art in the past but I found that using a thin nail art brush helped to speed the process along.


You should also check out the other participants looks this week, they always come up with really cool ideas!


 Click the links below :)

3/20/2013

ABC Nail Challenge: K is for Hello Kitty

This week we're on the letter K for the ABC Nail Challenge and I had a hard time with this one. I didn't have a nail polish or brand that began with K. So then I thought of nail art and couldn't think of anything except stamping. I do have stamping plates but there not by Konad so that wasn't going to work. My last resort was Hello Kitty nail art and I'm not even sure if this is allowed since it technically doesn't begin with a K. If I'm breaking the rules I'm sorry :)


I am not really good at detailed nail art so I wasn't expecting this to come out great and as you can see it didn't. It might have not looked so bad if I didn't end up  putting my top coat on too soon and smearing the eyes and nose! I attempted to fix it but I think I just made it worse.


This is obviously my worst week so far which is why I only posted two pictures, but it happens. I'm looking forward to redeeming myself next week :) Like always, I'm excited to see what all the other participants came up with this week!!


Click the links below :)


3/17/2013

St.Patricks Day Water Marble Nails!

I always say holidays are a great excuse to do nail art, even if it's not your favorite holiday. I should have posted this earlier but the truth is I didn't do them until yesterday. I'm not sure what made me decide on a water marble design considering I've only been successful at it a few times. I was hoping I could get a four leaf clover design but I was just happy that they came out good.


I used Permission to Proceed by Wet n Wild's Spoiled line for my base. Weird name, right?  It's a sheer medium green and the formula is pretty bad, it goes on very streaky. For the water marble I used Going Green and Mint Sorbet by Sally Hansen Xtreme Wear, a regular green and a pastel green. Do you do anything special on St. Patricks Day?

Happy St. Patricks Day!!

Click the links below :)
Photobucket

3/13/2013

ABC Nail Challenge: J is for Jelly Sandwich

This week we're on the letter J in the ABC Nail Challenge hosted by Kimber at Kimber's Lacquer Korner. She is amazing at nail art so if you want to see some real inspiration check her out!  I decided to do a Jelly Sandwich manicure, I haven't done one in a while and I'm in a glittery kind of mood today.


For the base and top color I used Splash by Pure Ice and for the glitter I used Nail Junkie by Sinful Colors. Splash is a frosty pale blue shimmer that needs 3 coats for full opacity. Nail Junkie is a sheer teal jelly filled with flecks of silver, blue and green glitter. It's a little thick and gloppy but not too hard to apply, especially if you're just layering it, but still one of my favs from Sinful Colors.

I almost didn't want to apply the third layer (of Splash) because I loved the way Nail Junkie looked over Splash alone, but this is a Jelly Sandwich so I added it and liked it. I'm sure I'm not going to like removing this but thank god for the foil method!!


I wish my camera was able to capture better pictures of my nails, especially when I'm wearing glitter because you can't see the exact color/effect of what I see. 

I don't know what made me think of this but instead of using my regular top coat I used my Matte-ly In Love by Hard Candy. I guess I was also in a Matte mood too :) I love glossy nails but I also really like the look of matte finished glitters. It totally changes the look of your manicure. You can't really tell in the pictures but it makes the glitters individually pop.  


I'm going to check out what all the other ladies have done this week, make sure to check them out too :)


Click the links below :)

Photobucket

2/28/2013

ABC Nail Challenge: H is for Half Moon

This week we are on the letter H for the ABC Nail Challenge and I was hoping to use a nail polish that's name began with a H but I only had a few and they weren't my favs. This was kinda a rushed mani and that's why I didn't get the post up last night  :(  Anyway, I chose to do a half moon manicure even though this isn't a look I love. I only tried it once last year because it was required in the other nail challenge I participated in. I remember not liking the outcome at all and it being hard to get all the moon shapes equal in size. I wouldn't say these came out great but I guess there not too horrible.

 half moon nail art.jpg
Radiant by Revlon

The colors I used for this look were: Snow me white by Sinful Colors for the moon and Fashionista by Revlon for the top color. Fashionista is a dark saturated teal cream shade and the consistency is almost perfect making it very easy to apply. This color always looks better in person than it does in the pictures; it doesn't look as patchy. I added a coat of Radiant by Revlon to my accent nail. Radiant has a blue clear tinted base with blue glitter and larger green and silver hexagon shaped glitter. It's perfect for layering over Fashionista since the colors are so similar. Then of course used Seche Vite for my top coat.

half moon nail art.jpg
Fashionista by Revlon-Sorry for the blurry pic :(

half moon nail art.jpg
Seche Vite Dry Fast Top Coat

I used those hole reinforcement stickers for the first few nails but those things don't like to stick too well to your nail so then I used french manicure guides for the rest of the nails. That's why some of them have a neater line than others. If I wasn't in a rush I probably would have started over again.

 photo half2.jpg

Now I'm off to see what the rest of the ladies came up with this week. Make sure to check them out too, they always come up with great looks :)


Click the links below :)

Photobucket

2/20/2013

ABC Nail Challenge: Letter G

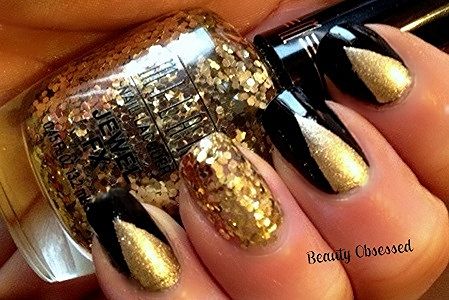
Hey Everyone!! This week is letter G for the ABC Challenge and I decided to do a Gold Glitter mani. I think I'll always love glitter polishes no matter year, season or day it is.  I also did some nail art using scotch tape.


I used Black Out by Sally Hansen Xtreme Wear for my base on all my nails except my ring finger. Then I applied a coat of Seche Vite and let them dry for a good 20 minutes. With two pieces of regular Scotch tape I made a triangle shape to place on my nails and filled in the area with a coat of Gold Coin by Revlon. While the polish was still wet I carefully removed the tape. Once I did all my nails I applied another coat of Seche Vite, can you tell that's my favorite top coat? :)


On my ringer finger I used Milani's Jewl FX  in Gold. I have a few of the other polishes in the Jewel FX collection and there more of a fine glitter but this one takes it up a few notches. To me this isn't normal glitter polish, it's like a dense layer of miniature sequences in a clear base. You can't paint it on like usual, for me I found it easiest to just apply a few blobs and use a toothpick to separate the glitter until my whole nail was covered. 


I'm excited to check out all the other ladies nail looks this week!! If you want to take part of this challenge just go to Kimber's Laquer Korner and let her know you're interested!!:)


Click the links below :)

Photobucket

2/18/2013

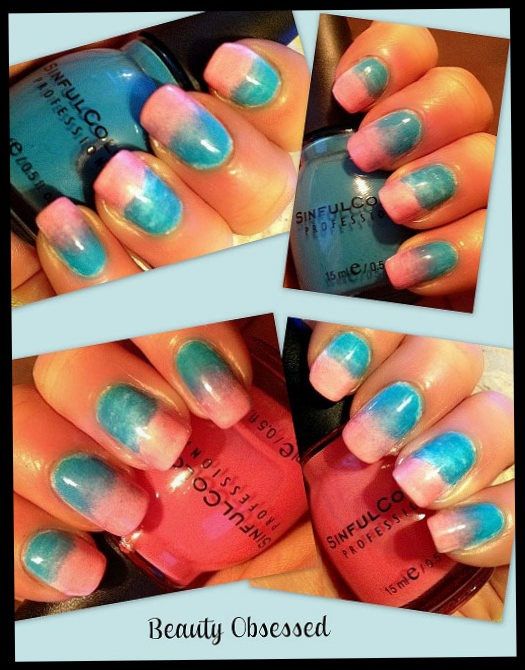
Blue & Pink Ombre Nails!

I know the whole Ombre trend was last year but I decided to try them out on my nails (I know I'm behind the times lol). I'm actually surprised that this was my first time since I love trying new nail art trends.

But anyway, I just wanted to do a quick post showing you how they came out. I didn't pick the usual lighter to darker colors within the same shade. I used Scandal and Savage by Sinful Colors because I think they look gorgeous together.


If anything the color combo reminds me of spring/summer or a bright sunny day. A few of the nails didn't blend together as well as I would have liked but its okay.

This was one of the easiest nail art looks I've done. I applied 2 coats of white polish as my base. I cut one of those white makeup sponges in half and used the flat side to paint one half blue and the other pink. Then I just aligned the sponge up with my nail and kept dabbing onto my nails and then repeated the process of painting the sponge and dabbing. So I did two coats using the sponge. (If that made any sense). Adding a coat of Seche Vite makes such a difference, before they looked a little splotchy but the topcoat made them look nice and shiny!!!

What do you think of my blue and pink ombre nails?


Click the links below :)

Photobucket
Related Posts Plugin for WordPress, Blogger...