2/24/2013

Sharing is Loving! My Weekly Round Up!

Hey Beauties!!

So I decided to link up with My So-Called Chaos and High-Heeled Love in there weekly round up. I think it's such a great idea to give love to other bloggers and share what they have posted.


The whole idea of the weekly round up is to share the posts that you really liked or inspired you in some sort of way during the week and list them for your readers to see. I'm going to do this every Sunday from now on!! 

Here are some of my favorite posts I read over the week, these are just some, there were a lot more. 

* Janna from Gloss and Glitz who is one of my best blogger friends had a huge announcement to share in her post. She was MIA for a bit and had a really good reason for it. She told us that she is having a baby!!! I was extremely happy for her and you could just tell how happy she was in her video. I told her that not only is she going to be a terrific mom, she's also going to be a huge MILF!!! lol :)

* One of my other best blogger friends, Nykki from  Nykki-Talks-Beauty wrote a funny post on her love for monkeys and her day at the zoo with her niece and nephew. I loved the part when she said she really wanted to take the monkey home and her 5 yr. old niece said no! lol

* If you know me then you know that I'm a nail polish junkie so I love reading anything nail polish related. I came across a post on Makeup Savvy.co.uk called Favorite Nail Polish Essentials. She shared her favorite base coats, top coats, matte top coats and black and white polishes. I now have a few new nail polishes on my shopping list thank to her post!

* Beautyqueenuk wrote a post this week on the Yes To Carrots Feel the C Pampering hand and nail spa product.  Just like her I always feel like my hands and nails are dry so I'm always looking out for moisturizers that will actually help. I like reading product reviews by bloggers I trust. Not only does she tell you what the product is and what it does, she also goes into detail on how and why you should use it. Another product added to my shopping list!!

* I've heard very little about the new Rimmel Wake Me Up Foundation and haven't seen it in any stores here yet. I've still been very curious about it though because I really like Rimmel's Lasting Finish 25 hour foundation.  Kimberley's Blog had a really thorough review on this product. She gave some pros and cons which really helped determine if this foundation is a good fit for my skin type. I think I will give it a try when it comes over to the U.S.


Click the links below :)



Photobucket

2/23/2013

Throwback Saturday- Bobbi Brown's Tips on Blush!

Hey Dolls! I hope everyone is enjoying there weekend! It's Throwback Saturday so I kinda randomly picked one of my "Beauty Tip of the Week" posts that I used to do. If you've been following my blog since the beginning you probably remember that every Wednesday I posted a beauty tip. I'm thinking about maybe starting that again, I stopped because I started running out of tips to share with you guys. Let me know if you like reading beauty tips, if you do I will start that up again :) The post below was written on November 16th, 2011 and it's tips on how to apply blush from Bobbi Brown. I'll shut up now and let you read the post :)


Beauty Tip of the Week

JUST ADD COLOR!

BOBBI BROWN'S TIPS ON BLUSH

I'm sure you have all heard of the makeup artist Bobbi Brown or at least of her makeup products. If you haven't she's an internationally reowned makeup artist and CEO of Bobbi Brown Cosmetics. Her products are sold in more than 400 stores and 20 countries worldwide. In addition to her creating cover looks for magazines, working with models, fashion shows, etc. She's also the author of two New York Times bestsellers. I have one of her books, Bobbi Brown Beauty Evolution. It's a really good book and she's filled with tons of tips and tricks.

So for this week's beauty tip I thought I would share a few of her tips on blush and give you a break from my boring tips lol. She has a whole chapter dedicated to blush and its called Just Add Color. Here are some of Bobbi Brown's best tips when it comes to wearing blush:

Bobbi's Guide to Just the Right Blush of Color
  • Porcelain Skin: Pale pink or pastel apricot (never use bronzer or brown toned blush; it will look dirty on your light skin)
  • Fair Skin: Sandy pink tones
  • Medium Skin: Tawny brownish pinks
  • Tan Skin: Deeper brownish  rose
  • Latin or light black skin: Plum, golden brown,  or deep rose
  • Black Skin: Dark or deep bronze or deep red
  • The second shade: For an extra pop of color: choose anything that's a bit brighter than your regular blush and one that works well with your lipstick

Bobbi's Blush Rules
  • Find a color that makes you instantly healthy
  • The right blush should practically blend itself. If you have to work to blend it, the color is too dark or too bright.
  • Own two different shades: one that looks totally natural and is the color of naturally flushed cheeks, and one that's a bit brighter for a pop of color
  • In a pinch, use your lipstick on your cheeks as you would cream blush

To apply, smile at yourself in the mirror and dab the blush on the apple of cheek, blending up into the hairline. The trick is to also blend down to truly soften the color and make it look like it belongs on your cheeks. Then add a pop of a brighter color just on the apple of the cheeks to guarantee that you don't look washed out in an hour. The same basic technique applies to using cream blush.  Dot it on the apple of the cheek and use your finger to blend it up to the hairline and down. 

Is this how you usually apply blush or do you have a different technique? I personally never check to make sure my blush practically blends into my skin like I do with foundation. I hope I haven't been walking around looking like a clown! lol


Click the links below :)
Photobucket

2/20/2013

ABC Nail Challenge: Letter G

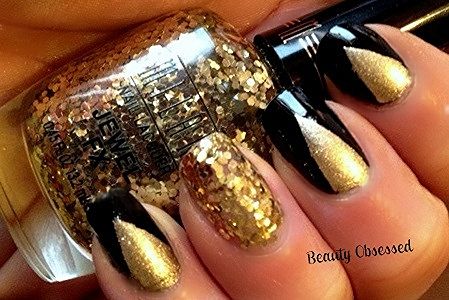
Hey Everyone!! This week is letter G for the ABC Challenge and I decided to do a Gold Glitter mani. I think I'll always love glitter polishes no matter year, season or day it is.  I also did some nail art using scotch tape.


I used Black Out by Sally Hansen Xtreme Wear for my base on all my nails except my ring finger. Then I applied a coat of Seche Vite and let them dry for a good 20 minutes. With two pieces of regular Scotch tape I made a triangle shape to place on my nails and filled in the area with a coat of Gold Coin by Revlon. While the polish was still wet I carefully removed the tape. Once I did all my nails I applied another coat of Seche Vite, can you tell that's my favorite top coat? :)


On my ringer finger I used Milani's Jewl FX  in Gold. I have a few of the other polishes in the Jewel FX collection and there more of a fine glitter but this one takes it up a few notches. To me this isn't normal glitter polish, it's like a dense layer of miniature sequences in a clear base. You can't paint it on like usual, for me I found it easiest to just apply a few blobs and use a toothpick to separate the glitter until my whole nail was covered. 


I'm excited to check out all the other ladies nail looks this week!! If you want to take part of this challenge just go to Kimber's Laquer Korner and let her know you're interested!!:)


Click the links below :)

Photobucket

2/18/2013

Blue & Pink Ombre Nails!

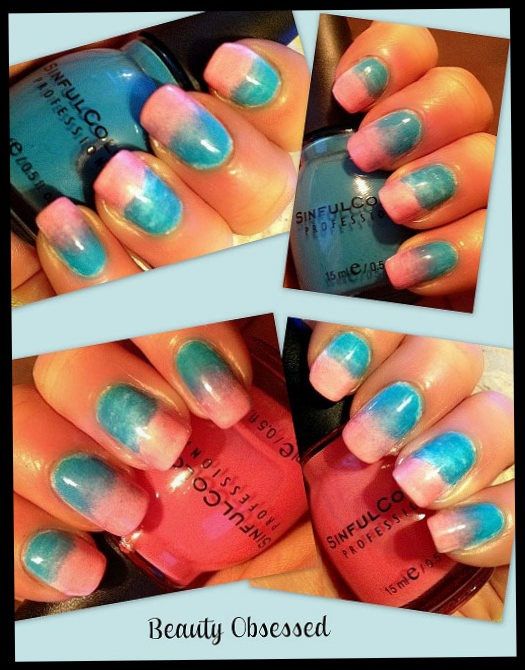
I know the whole Ombre trend was last year but I decided to try them out on my nails (I know I'm behind the times lol). I'm actually surprised that this was my first time since I love trying new nail art trends.

But anyway, I just wanted to do a quick post showing you how they came out. I didn't pick the usual lighter to darker colors within the same shade. I used Scandal and Savage by Sinful Colors because I think they look gorgeous together.


If anything the color combo reminds me of spring/summer or a bright sunny day. A few of the nails didn't blend together as well as I would have liked but its okay.

This was one of the easiest nail art looks I've done. I applied 2 coats of white polish as my base. I cut one of those white makeup sponges in half and used the flat side to paint one half blue and the other pink. Then I just aligned the sponge up with my nail and kept dabbing onto my nails and then repeated the process of painting the sponge and dabbing. So I did two coats using the sponge. (If that made any sense). Adding a coat of Seche Vite makes such a difference, before they looked a little splotchy but the topcoat made them look nice and shiny!!!

What do you think of my blue and pink ombre nails?


Click the links below :)

Photobucket

Monday February 18 2013 BLOG HOP!


Monday Beauties Blog Hop February 18 2013


Hello Beauty Lovers and Bloggers! :) Welcome back to Monday Beauties blog hop! Where I hope to create a place where bloggers can come together and share their links in a friendly and supportive manner! If you are saying "What the hell is a blog hop?" just click here and it will explain EVERYTHING:)


Now let's get to business: Here are the very simple rules:


1. Subscribe to my blog via GFC and leave a comment below to let me know you are following (with your link) so I can follow back :)
Click here to follow :)


2. Add your blog URL to the Linky Below! (make sure to include http://www.)


3. Check out as many blogs as you want and if you decide to follow leave a comment letting them know that you have subscribed and found them on Monday Beauties Blog hop! :)


4. Check out the featured blogs! :)


OPTIONAL If you want to be really nice to me! :)


♥ Grab the blog hop button and place it somewhere on your blog or in a blog post. (remember you will need to re-enter your blog every week, so you can make this a weekly post). You can grab the blog button from the sidebar of my blog.


♥ Follow me on Twitter and like my Facebook page :)


Please share with your subscribers! If you share on twitter use the hashtag #mondaybeauties so we can retweet :)


**I will choose 2 blogs each week via Random.org(random number generator) and mention them in the next weekly hop as "Featured blogs"


Thanks so much for participating! :) Lets Begin


Featured Blogs:


2/15/2013

Rimmel Scandal Eyes Show Off Mascara; Review

I am so picky when it comes to mascara. It seems like I've tried so many but have only been really impressed with a few. So, it's rare when I find a mascara that I feel is worth mentioning.  Rimmel Scandal Eyes Show Off  is worth a mention in my opinion. I picked this up at CVS about a month ago and have been using it ever since.

Rimmel Scandal Eyes Show Off Mascara; $6.99 at drugstores

The selling point of this mascara is the unique flat brush with the round bristly ball at the end. According to Rimmel, the flat side of the brush is what gives you the volume and the ball tip is for lifting and defining. I can honestly say that I agree. The round ball at the end is also good for getting those hard to reach lashes in the corner. 


One of the reasons I like this mascara is because the application is super easy, no mess, no clumps or anything even after two coats. In the before picture below my lashes are curled with no mascara and the after picture is with two coats. I only have a very light coat on my bottom lashes. (Sorry about the pictures guys, I don't know why the rims of my eyes look so pink and scary).


Overall, I like this mascara, I mean it doesn't look like I have false lashes or anything but it does the job. It gave me length, some volume and the ball tip is excellent at separating my lashes. It stays put and my lashes look exactly the same at the end of the day. Oh, and you have to love the bright purple packaging, at least I do. I feel like Rimmel's products are usually hit or miss so it's nice that this is actually a hit. You can't beat the price either, I got mine at CVS for $6.99. 

Have you tried this mascara, if so what do you think?


Click the links below :)

Photobucket

2/13/2013

Check out this GREAT GIVEAWAY!!!!

Meet Me on the Bright Side is currently having a giveaway!!! You really should check it out to see all the awseome prizes in detail!!! Click here to enter!!


Photobucket
Related Posts Plugin for WordPress, Blogger...