7/21/2011

DIY: How To Make Sea Salt Spray (To Get Beachy Waves)

This sea salt spray recipe is used to create that beachy wave look in your hair. It’s a great alternative to the ocean or the sea, it brings out the natural bend or wave in your hair. This will work on all hair types, however if you have poker straight hair or it's really fine, you’'ll just have to put a little more work into this by using some hairspray or a curling iron.  I love this because you only need a few items that you probably already have in your kitchen and if not you could purchase everything for really cheap!  


What you will need:

  • A clean spray bottle that holds 8fl. oz. of water (you can find them at the dollar store)

  • 8fl. oz. of distilled or filtered water.

  • 1 teaspoon of Sea Salt (I like using the more finely grounded stuff because its easier and faster to mix. You can get a large container for $2 or $3)

  • 1/2 teaspoon of Coconut scented conditioner (doesn’t have to be expensive, I used the Sauvé brand for a $1 at the dollar store. This is used to add the beachy scent and also to counteract the drying that the sea salt will cause. (if your hair is extra dry add a little more than a 1/2 teaspoon).

  • A dab of hair gel (preferably unscented otherwise it will interfere with the coconut smell, try using a cheap brand bc the consistency is more runny and will mix better)

Optional Add Ins:

*Essential Oils: if you have dry or coarse hair this is a good option. It will help condition and add some shine. You can use whatever scent you want. Use 3-5 drops

  •   Ylang Ylang is great for sensitive skin and problem scalps

  •   Rosemary is great to help deepen the color of brunette’s hair and Chamomile brightens blonds

  •   Tea Tree Oil is best if you have oiler hair, it wont make it oily or weigh it down

*Extra Sea Salt: you can add a little more if you have oily/thicker hair. The more salt you use the more it will dry out your hair, BUT the more you use the beachier your hair will look  and it will have more hold

*If your recipe doesn’t have enough sea salt, add 1/4 tsp. at a time until you reach the desired level. (Make sure to write down your changes so you will know how much to use if you want to make more)

How To:

  1. Add the water into the bottle leaving about an inch of the bottle empty

  2. Measure 1 teaspoon of sea salt and pour into the bottle. (Use 1 tsp. of sea salt for every 8fl. oz. of water)

  3. Measure a 1/2 tsp. of coconut conditioner and add that in. Shake the bottle

  4. Add a dab of the unscented hair gel and shake the bottle again (you want to make sure the conditioner and gel is mixed well)

  5. Shake the bottle really well, make sure you don’t see any clumps of conditioner or gel. If you do warm up the bottle in the microwave for a few seconds.

  6. Then add whatever essential oil you choose to use. Don’t add more than 5 drops to the mix. Then shake again.

How to style you hair with the spray overnight:

  1. Start with freshly washed hair, detangle any knots gently with a wide tooth comb

  2. Part you hair any way you like

  3. Take a small section of your hair and spray generously with the sea salt spray, then twist that section of hair into a small bun and pin in place on top of your head.  You can use bobby pins or any clips that will work

  4. Repeat until all sections of hair are done. *Choose thicker sections of hair on top to keep the waves loose*

  5. Mist with more sea salt spray and sleep on it. If your hair is still damp in the morning take a blow dryer with a diffuser attached and move around your head until you feel its dry.

  6. Then take out all the pinned sections and mist your hair with some more spray. Randomly twist some sections of hair with your fingers then flip your head, with your blow dryer and diffuser attached  and scrunch your hair while blow drying. (use the medium setting of your blow dryer)

*If you don’t want to wait overnight you can skip the small buns and either braid your hair into 3 sections (this will give you bigger waves). Or you can split your hair into 3 sections, (one in the back and two on each side of your head). Then twist each section (like you did if you were going to do this overnight) except the bun will obviously be bigger. (You can use a hair elastic to keep the bun in place) Mist hair with the spray again. You can either use a blow dryer to dry the buns/ braids or you can sit outside if it's really warm out. When you feel like its dry enough, take out the braids/ buns and flip head over and scrunch while using the blow-dryer.

*You can now play around with it to achieve your desired look; you can add some hairspray to give it more of a curly effect (don’t use too much, you don’t want it to look crunchy)

*If you have naturally straight hair that doesn’t curl easily, you can use a curling iron and wrap random pieces around the curling iron for a few seconds to give it extra waves/curls.

There you go, you should have nice beachy waves!
 You can choose your own way to style your hair, the options I gave you worked for me but I’m sure if you want you can find other ways of using the sea salt spray to get the effect you want. If you guys try this please let me know, I would love to hear how it turned out! Have a fab day beauties

7/20/2011

Beauty of the Day: Mila Kunis

How gorgeous is Mila Kunis? I used to think she was so cute when she was on that 70’s show but now she has transformed into one of the most beautiful woman in Hollywood. This picture is from the  movie premiere of her new move “Friends with Benefits” in new york city.
Her makeup artist Tracey Levy was inspired to give her a look similar to that of Italian actress Gina Lollobrigida, aka: gorgeous bronzed skin, eyes that popped with nearly nude lips. I think her mission was accomplished greatly. Here’s a list of the products used to achieve this look: All makeup by Lancôme

   Face:
    - Teint Miracle Foundation
    - Star Bronzer in Solaire
  Eyes:
      - Color Design 5 Pan Palette In Bronzer Amour                                                     
   - Hypnose Doll Lashes Mascara  
                              
     Lips:
         -Juicy Tubes Gloss in Tickled Pink

7/19/2011

Vaseline’s my new best friend


If you are like me, you love multitasking and cheap products that work! Right?! One of the best kept beauty secrets is actually Vaseline. Who would have know that you can use this $4 product to kill so many beauty birds with one stone. I am going to list some of the ways you can benefit from petroleum jelly: 

Vaseline® Petroleum Jelly

1.) Tame your unruly eyebrows with your eyebrow comb and a dab of Vaseline
2.) Sooth chapped winter lips, elbows, or other dry areas  with Vaseline.
3.) Vaseline removes make up in a snap! (my personal favorite usage for Vaseline).
4.) If you have a habit of picking your cuticles,  Vaseline softens them to make it less tempting to pick at them.
5.) If you apply a small amount to your cheeks, it gives a dewy look
6.) If you put Vaseline under your eyeshadow, it gives it a sexy wet look to your everyday matte.
7.) Eczema sufferers, Vaseline can help improve atopic eczema
8.) Want softer hands or feet?  Put a coat of Vaseline on your feet at night, cover them with socks, do the same with your hands and use cotton gloves.
9.) Feel like your perfume could last longer? Well, put some Vaseline on your wrist before you spritz, it will keep you smelling wonderful all day and night.

I know that some of these tips are common, but until I did some research on the usage of Vaseline I was never aware of some of them. Especially, the perfume tip and the cuticles tip.

Great Giveaway at Prettymaking!


Prettymaking is having a great giveaway on her blog!!!!


This is a really cool giveaway that includes some awesome prizes!

It ends on August 13th so go enter!!


http://prettymaking.blogspot.com/

7/18/2011

Cat Eye/Winged Out Liner:

NICOLE RICHIE ROCKS THE CAT EYE


Ahh!! the famous winged out cat eye look. This is a look I’ve always admired, especially on Nicole Richie. I don’t know if it’s the fact that it looks really great on her eye shape or if it’s the style she does (it’s probably both). For you guys that have tried to achieve this look probably know its not the easiest to do, when your first beginning anyway. I know for me that was the case, I’ve bought so many different brands and types of liquid liner (that are now are all lonely piled up in my makeup draw). I would practice, practice AND practice this look determined to get it right.

 My problem was that one eye would look okay but then I could never get the other eye to look the same!!. I watched multiple tutorials on youtube, followed every magazines step by step articles, then after what seems like years of trying to get this down to a science I finally did it. (and both eyes even matched)!! Now I know exactly why I wasn’t doing it right. First you need to find the right liquid eyeliner (or it could be gel or pencil liner). I finally found my favorite liquid eyeliner, L'Oreal's Felt Tip liquid liner and it made the process so much easier. Then you have to make sure you have your chin up while looking in the mirror, this way you can make sure your getting the liner as close to the lash line as possible. While your doing that you can hold the skin of your upper lid taught, and dot the liner along the upper lash line. Then extend the line upward at the outer corner of your eye ( make sure you don’t make the line too high). Then where the top of that line is hold the liner and in a quick motion make a downward line in the style of “Nike sign” (or look at Nicole's eye and I might start to make sense lol). Then with the liner fill in the shape you just made. Remember when you first start dotting the liner along your upper lash line start thin and make the line thicker as you get to the outer 3rd part of your eye. (that will also help you make that “Nike” sign im trying to to explain). Then do the other eye being careful to make sure both eyes match( you don’t want one line higher on one side than the other). I've had to use several cotton swabs to try and make them look even. I'm happy to say (even though it literally took me a few years of practice) I'm pretty sure I’ve finally mastered the cat/winged eyeliner. There’s a really great tutorial on youtube by Eve Pearl on how to do this. She literally goes over each step while showing you at the same time. It really helped me. 


Review: Generic Version of the Paul Mitchell Super Skinny Serum


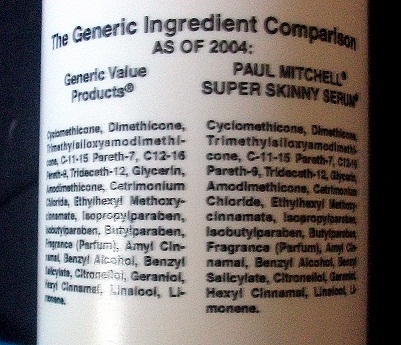
Generic Value Products is a line that makes generic versions of high end hair products. The one I'm reviewing is Paul Mitchell’s Super Skinny Serum. They have a lot of different comparisons to some great brands, to name a few, (Biology, Redken, Matrix and many more). The beauty of this is that they claim to have the same exact ingredients that Paul Mitchell's super skinny serum does. On a scale from 1 to 10 I’m giving this product a 10 and here's why:


I should tell you a a little about my hair type so this makes sense. I have very thick hair, that is now cut short layers and long layers (which has helped to thin out my hair a lot), and the length is about 2 inches past my shoulders. If I was to let my hair air dry w/o any products applied it would be fizzy, dull looking with no shine or body at all. (not a cute look for me).


I’ve tried so many different serums including Paul Mitchell’s and I was in love. I never ended up purchasing it bc it was a little on the pricy side, I want to say it was around $25 for a medium size bottle. I was determined to find something just as good with a smaller price tag.


I was at Sally’s Beauty Supply with my friend one day and she pointed this out and said it really does the same thing as Paul Mitchell's brand. Of course I was skeptical especially after seeing that it only cost $7.99. She showed me the back of the bottle where it lists all the ingredients in the generic brand and in the real brand, and they both had the same exact ingredients. So I had to give it a try.

 ( it was hard for me to get a good picture showing the back of the bottle bc of way the bottle is shaped, but if you look closely I think you can see that both brands have the same ingredients)


I came home and took a shower, applied my leave in conditioner then applied this product. *Quick Tip: The best way to apply styling products (especially serums and gels) is to put a dime size amount into your palms, rub them together then flip your head over and start at the ends of your hair and work your way up till the mid shaft. You want to take your time while doing this to make sure every strand has been coated.** I don’t apply this past the mid shaft because that will just weigh down the top leaving me with no volume. I use a root boosting spray for the roots and the crown for extra body and volume.


I was highly impressed with this product, after blow drying my hair it was frizz free, soft and shiny! I would usually make a pros and cons list but I cant really think of any cons, except if you apply too much it could make your hair look greasy but that applies to any type of hair serum. I am so happy I found this product . Seriously! It’s three times cheaper than Paul Mitchell’s skinny serum, the bottle is bigger and I got the same results that I would if I was using the more expensive brand.


I’ve had this bottle for about a year now and still have a little less than a half a bottle left, I would have more If my mom didn’t use it time from time on her hair, lol she loves it too so I’m happy to share. I’m very eager to go to Sally’s and try their other products to see if they’ll also have the same effect. I strongly recommend this for you girls that either are using Paul Mitchell’s serum but don’t want to spend as much or if you’re looking for a really good product to eliminate frizz. You wont be disappointed, trust me!!!
Suggested Retail price $7.99 at Sally’s Beauty Supply stores or if you order it from their website http://www.sallybeauty.com it’s usually cheaper

7/16/2011

How To: Use Concealer To Cover Up Blemishes

I’ve realized you can drink as much water as you can a day, get the normal 8 hours of sleep and even eat really well , but we’re still going to have breakouts occasionally. It’s always my luck that my skin will breakout at the worst possible times (dates, weddings, proms) you know how it goes. I know that popping a pimple is not a good idea, but I’m sorry, there’s no way I can go out with a big whitehead on my face. There’s just something about whiteheads that grosses me out (obviously) so the last thing I want is someone to be staring at this grossness on my face. (maybe its just me or my insecurities) so I do end up popping them. Only if its necessary, I don’t try to pop a pimple unless it comes to the whitehead stage, (yuk) I don’t even like saying or typing the word “whitehead”..
Using the right tools, concealer and steps you can cover up that monster and go about your day!

(if you look closely you can tell that Megan Fox covers up her pimples and you can hardly tell)!


Covering a Blemish

1. After you’ve washed your face, apply an ice cube to the zit for a few minutes. Ice will help the redness and swelling go down. Also, try applying a little drop of Visine, it takes the red out of your eyes and does the same for your zit. *If it’s already been popped apply a salicylic acid medicine. I like Clean & Clear’s popped pimple relief gel pen.
2. Apply your foundation, powder or whatever your preference is. Always apply your foundation before covering up pimples, not the other way around.
3. Get your concealer out, cream concealers are the best for covering blemishes. I use Maybelline’s Dream Mouse Concealer. It should also match your skin perfectly, I’ve heard many times that you should choose a shade lighter. No, using a lighter shade just draws more attention to the blemish.
4. Put some concealer on your brush (pointy brushes work the best for this). Have you guys ever used the method stippling to apply your foundation? Well, this works really well for concealing too. For those of you that aren’t familiar with this method, Stippling means to dab the product on rather than rubbing or stroking the product onto your skin”. I've found that stroking or rubbing the concealer on doesn’t give you the heavy coverage you want and it ends up rubbing off.
5. Now blend the outer edges of the concealer into your foundation. Don’t touch the zit, if you find that it looks cakey or thick just keep stippling it in.
6. Once you’ve done that take loose powder and a small fluffy brush and set the area with the powder gently. You don’t want to rub off the work you just did.
This wont cover up the actual bump, makeup only corrects the color, not texture. Chances are you’ll probably still see the bump but as long as it matches the rest of your face it will be so much less noticeable.
Related Posts Plugin for WordPress, Blogger...