7/13/2011

How To: Zebra Nails!

ZEBRA NAILS!

I’ve always loved different types of nail art and designs, ever since I was old enough to paint my own nails. It’s just fun to do plus it looks really cool. One of my favs is the zebra/animal print. I do this all the time, especially in the summer bc I like doing them on my toes too. Before the first time I tried it myself I didn’t know exactly how to go about it or what kind of nail polish to use. I was looking for a tutorial on YouTube and I found Kandee Johnson’s video on how to do zebra nails. She made it look so easy so I literally watched her do one of her nails as I was doing mine then I was able to do the rest of my nails in 5 minutes. So it's really that easy!

For those of you who don’t know who Kandee Johnson is, she’s a YouTube guru, professional makeup artist and extremely talented. Plus she’s one of my favorite guru’s. I’m going to post her video in this post for you guys to see. 


7/11/2011

Egg Your Face!!


How to Add Eggs to Your Beauty Routine


I never realized that that these simple eggs could be used to my benefit (besides for eating)! But for beauty, there’s a few great recipes I've found that you can add to your beauty routine tonight! 


1. Egg and Honey Face Mask

Whip up one egg and a teaspoon of honey together in a bowl

Apply evenly to your face, avoiding your eyes and wait for it to dry

After 15- 20 min wash your face with lukewarm water


The egg tightens pores and the honey moisturizes.

For Normal to Dry Skin: Use only the Yolk of the Egg

For Oily Skin: Use only the Egg White


2. Egg, Vinegar and Olive Oil Hair Conditioner

Mix together 2 eggs and 2 tablespoons of olive oil

Coat your hair thoroughly with the mixture and cover with a shower cap.

Wait 30-45 minutes and rinse out with lukewarm water. If you use too hot of water, the egg might start to

harden which will turn into a nasty mess

The final step is to do a final rinse with 1/2 a cup of vinegar.


The olive oil seals in moisture and conditions your hair, while the letchin and protein of the egg helps to moisture and strengthen your strands. Adding vinegar at the end adds shine to dull hair.


3. Egg White and Oatmeal Acne Mask  

In a small bowl beat the whites of one egg until smooth

Add 1 teaspoon of oatmeal and mix together until it forms a paste

Apply evenly to your skin and let dry for about 15 minutes

Rinse off with lukewarm water


Egg whites act as an astringent which tightens pores and tones the skin, while oatmeal draws out oils and impurities.

How To Use Makeup To Create The Illusion Of A New Nose:

Rhinoplasty is one of the top five most common plastic surgery procedures performed each year! Rhinoplasty is the technical term for a “nose job” and its considered  a major surgery because you will be put to sleep, and of course all the risks that are involved. including  anesthesia complications, bleeding troubles, infection and, in severe cases, death. (yikes)!  Unless you need this surgery for severe breathing problems, injuries or you really feel like you desperately need it done then maybe its worth it. However, for those of us who think our nose is either too long, too wide or whatever your reason is for wanting to change your nose, there's good news. Makeup can be an effective way to contour your nose. This isn’t something I do everyday while applying my makeup, its good for photo shoots or a special occasion or even a night out. It’s just a little tip I’ve learned that has helped me. I’ve always wished my nose was a little bit shorter and thinner. I hope you guys find this “how-to” helpful.  

WHAT YOU’LL NEED:


Contour Powder/Cream

They make products specifically for highlighting and contouring, you can purchase one of those if you’d like or you can easily use a foundation that’s 2 to 3 shades darker than your skin tone or a Matte brown eyeshadow will work just as good. (that’s what I use).


Make sure if your going to use an eyeshadow that there is no sparkle or glitter to it, it should be a Matte finish


Highlight

You can either use a highlighter that comes in a Contour and Highlight set or you can use white/nude eyeshadow or again a foundation 2 to 3 shades lighter than your skin tone.


Angled Brush

An angled brush is ideal for sculpting your nose. If you don’t have this exact same brush use one that is small so you have more control over where the product ends up.


Fluffy Blending Brush

After you contour your nose with the angled brush you need to blend it in so theirs no harsh lines. A fluffy brush will work or a blending sponge.


How to Slim a Wide Nose


step 1. Apply your foundation like you would usually. I would wait till your done with your entire face to start contouring, so that way you will be able to judge how it looks with your overall face.


step 2: Dip your angled brush into your contouring powder or eyeshadow and draw a line down each side of your nose. Keep it light. It’s easier to build more product than take it away. Check out my diagram above to get an idea of where to place your lines. ( lol…I know, they might now be the straightest lines but I tried, and at least the lines are where there supposed to)  


**Optional Contouring: Depending on your nose


*Option 1: If your nose is wide all the way up, carry the line to the bridge of your nose.


*Option 2:  If your nose is wider at the bottom, draw a small line outwards when you get to the bottom of your nostrils.


*Option 3: If the tip of your nose is really wide then draw a “down facing arrow” once you reach the tip


Step 3: Clean off your brush


Step 4: Dip your brush into your highlight/crème/eyeshadow color and draw a slender stripe down the center of your nose. (see my wonderful work of art above) really sorry about how bad this looks but im sure you get the idea anyway. Now I know why I always sucked in art class..lol


Step 5: Take a clean fluffy brush or makeup sponge and blend your lines (be careful not to blend your lines together though) Blend until you can’t see a line anymore; it should look natural. Obviously my diagram is just an example of where you should apply the lines. (even if there crooked lines, lol)


However, if you followed the instructions correctly you should notice a subtle change in your nose! Let me know if it worked for you or if you have any questions on my instructions.

xoxo Kelly


7/10/2011

Beauty Myths/True or False?

Whacky Beauty Tips
Ya or Nay?

Throughout my life and probably yours too, we’re constantly hearing all about all these crazy beauty tricks to help us save money or time. Then we end up passing them along to a friend and then they pass it along to their friends and before you know it everyone believes if you apply toothpaste to a pimple it will magically vanish overnight. We hear about all these DIY tips that have probably been passed down from our great great grandmothers. Even though I’ve tried some of these tips, I’ve been wondering if I’ve just made myself believe that they work because I’ve been told over and over that their supposed to? or is there actual evidence from beauty experts that confirms that these tips do work?
So I’ve been doing some research online about some of these tips hoping to find the truth and I’m glad to say I was able to find out from various beauty experts if we should stop wasting our time with these or if theirs real evidence that they do work. I picked some random tips I’ve heard over the years from the top of my head and I’m going to share with you what's true or false thanks to experts Hairstylist, Rene Fris and Dermatologist, Doctor Neil Sadick.

1.Weird Tip: Mayo is a good deep conditioning treatment for your hair:
Expert Answer: Celebrity hairstylist Rene Fris says: “the fat and oils in mayonnaise does condition damaged hair follicles by coating them with oil, but I cannot encourage this wacky treatment” Instead, she says instead try a deep conditioning mask that is specially formulated for hair and with all those great products out there, why would anyone want to put mayo in their hair, the smell alone is enough to do damage.  NAY!

2. Weird Tip: Apply diaper rash cream to help cracked elbows and feet.
Expert Answer: Dermatologist, Doctor Neil Sadick says: “Diaper rash cream has moisturizes and anti-inflammatory ingredients that will help and hydrate the skin” YAY!

3. Weird Tip: Using a fresh dryer sheet on your hair will smooth away flyaways:
Expert Answer: “Dryer sheets to tame hair on the go. It’s only a temporary fix though, so if it’s a particularly dry winter day stash a few in your purse” says hairstylist Rene Fris says  YAY!

4. Weird Tip: To cure a sunburn take a warm bath in VERY STRONG black tea, the tannins take away the sting and swelling:
Expert Answer: This actually works, says Doctor Neil Sadick and it will definitely help alleviate any burning sensation. Tannic acid in the tea draws the burn out of the skin and helps it heal.  YAY!

5. Weird Tip: Lemon juice really does work to naturally lighten your hair:
Expert Answer: It absolutely does says Rene Fris. “Applying lemon juice to your hair before you go out in the sun is a sure way to lighten your hair. The acid reacting with the sun’s UV rays accelerates the highlighting process”  YAY!

6. Weird Tip: Urine works as an astringent on your face to clear up acne: (gross I know! but I have heard of this one lol)
Expert Answer: This is so false says Doctor Sadick. (thank god)! “Urine does not have any antibacterial agents or anti-inflammatory agents, he says. So the only place your pee belongs is in the toilet! NAY!

7. Weird Tip: I;:ve heard to leave olive oil on your hair 10 minutes before you wash your hair to condition it and I also heard it helps your hair grow faster:
Expert Answer: “Olive oil does help improve hair health by adding nutrients and healthy fats to the root” says Fris so using it as a deep conditioning treatment does work to make hair silkier” As for helping hair growth, Fris advises that “it doesn’t speed up the process of hair growth enough to make it a useful solution”  YAY and NAY!

8. Weird Tip: Rubbing your face with a potato dries up oily skin:
Expert Answer: “Nothing in a potato reduces sebum content which is part of the oil that coats the skin and causes acne” says Dr. Sadick. NAY!

9. Weird Tip: Using hot pepper sauce on your roots will help hair grow: (I’ve heard this one a few times)
Expert Answer: Rene Fris says “Cayanne pepper has been used in at home remedies for centuries” They say it helps improve blood circulation to the scalp, through oral ingestion or by applying at the root. If you are going to try this treatment you have to apply it all over the scalp he says BUT, “the jury is still out on this one, he has yet to come across anyone who has seen results from this treatment” so I would go with  NAY!!

10. Weird Tip: Toothpaste applied on a pimple will get rid of it:
Expert Advise: Doctor Sadick says this is “true” as it may have a drying effect on the skin. But its important to remember it has to be plain white toothpaste (no gels) and should be used only as a temporary spot treatment.  YAY!

11. Weird Tip: Hemorrhoid cream applied under the eyes reduces puffiness:
Expert Advice: This old school trick that you probably heard from your mother is actually does work says Doctor Sadick. It “may shrink them” as it is made with anti-inflammatory agents which can temporarily reduce puff. YAY!

I was surprised to find out that most of these beauty tips I’ve always wondered about do actually work.It just goes to show you, a little research and you’ll more than likely find out the truth to your beauty questions. I hope you girls enjoyed this, please comment if you use any of the beauty tips or just comment on whatever you want! lol. Kelly xoxo

7/06/2011

How To: Give Yourself The Perfect Manicure Step by Step

We all love pampering ourselves by getting a manicure at the salon. However we all know it can get a little expensive if your hitting the salon up weekly. If your looking to save some money, you can easily learn how to get a professional manicure by doing it yourself.
Things you will need:

*Acetone free nail polish remover

*Emery board/Nail file

*Nail buffer

*Cuticle trimmer

*Cuticle cream/oil

*Orange stick

*Hand lotion

*Base coat

*Top coat

*Your nail polish of choice

*Cotton balls

*Bowl of warm water

*Nail cutter (optional)

*Nail dryer (optional)

Preparing the Nails:  

1. Start off by getting rid of any traces of nail polish with your acetone free nail polish remover and cotton balls

2. (If needed) trim nails with a nail cutter to your desired length.

3. File nails with an emery board or nail file so that the edges are smooth. File towards the tip and only file in one direction. Never file to deeply onto the sides.

4. Soak your fingertips in a bowl of warm water to remove the nail residue from filing and to soften the cuticles. Leave in for 5 to 10 minutes then dry your hands with a towel.

5. Drop a trace of cuticle oil onto the base of each nail to loosen the cuticle. Then massage the nail base with lotion and use the orange stick to gently push back the cuticle of each nail until the dead skin loosens up. Use the cuticle trimmer to carefully trim away the dead skin around the nail.

6.  Buff your nails to file the ridges and to add shine. Again, only buff in one direction. Wash your hands thoroughly with soap and water to get rid of any cuticle residue. Dry hands and apply your favorite hand lotion and massage your hands.

Polishing Nails:

1.  Apply a base coat to protect your nails from chemicals and help make your nail polish last longer. Do one stroke down the center of the nail then one on the right and one on the left.

2. Before applying polish rub the bottle between your palms for a few seconds to warm it up for easier application. Never shake the bottle, this will cause tiny bubbles. Paint the nail in three strokes – one down the center and two on the sides. Be careful not to paint the cuticle. Repeat with a second coat but make sure to let nails completely between coats.

3. Touch up the edges of your nails by wrapping a small piece of cotton around the orange stick and dipping it in nail polish remover.

4. Apply the top coat. Use one coat of polish for each nail. The top coat makes the color last longer and gives the nails a brilliant shine.

5. Dry your polished nails for at least 30 minutes. To speed up the drying time use a nail dryer spray. Spray 6 inches away from your nails.

Easy, right? Just make sure you have enough time dedicated for this and especially to let your nail polish dry completely. Nothing would suck more than going through all that just to chip your polish because you were in a hurry. Hope you guys liked!!! xoxo

**See updated post by clicking here!**

7/05/2011

Five Favorites: June 2011

I’m a little late posting my June favorites since its already July . Better late then never, right? The products I pick every month aren’t always “new” or items that just came out recently. The purpose of my monthly Five Favorites is just to share with you the products I’ve discovered I'm loving and using this month. A few of the products on this list were bought this month and the others I’ve had and finally got around to trying. Again, these are products I’ve used myself and wouldn’t be recommending them to you if I didn’t really like them and thought they were worth buying.


Maybelline Dream Mousse Concealer


I’ve always had an issue with finding the right concealer to cover up blemishes, mostly the issue was with the color. I’ve read (and I’m sure you have to) that you should always pick a shade lighter than your skin tone to cover blemishes. I always went by that rule and that was my problem. I picked up this concealer hoping it would be the right shade for my skin tone.  Well it definitely wasn’t lighter than my skin tone but it was the perfect match and what do you know, it covered my blemishes beautifully! It really goes on smoothly and blends right in. It made me forget I had that annoying blemish. I love how it has that mousse like consistency too.  When using a lighter shade it just brings more attention to that monster. The variety of colors are wide which gives you a big selection to choose from. If you get home and decide its not the right color I'm pretty sure all CVS stores will let you return it with the receipt. The shade I use is Medium Beige. 

Tip: Use a pointy concealer brush (these work best for this), load up the brush with concealer and now stipple the concealer onto the pimple with the brush.
Stippling means to dab the product on, rather than rubbing or stroking it over your zit. You want as much coverage as possible and stroking tends to rub the product off. (not a good idea).
Suggested Retail Price $9.99 found at your local drugstores.


Tea Tree Oil

Tea tree oil is derived from a steam distilling of the leaves of the Melaleuca tree that is native to Australia. Pure tea tree oil (which is the kind you want to use) contains about 40% of a bacteria fighting ingredient called terpinen-4-ol.  With all that said, tea tree oil is  an excellent natural remedy for hundreds of bacterial and fungal skin ailments such as acne, abscess, oily skin, blisters, sun burns, athlete's foot, warts, herpes, insect bites, rashes, dandruff and other minor wounds and irritations. One of the most common uses of tea tree oil is fighting acne, when applied on acne tea tree oil helps the immune system to kill the bacteria and consequently reduce the inflammation.  Also, if you use tea tree oil with Vitamin E and a good healing agent it can not only heal your blemishes but also cure scar tissues. 

I’ve heard a lot about this natural oil doing wonders for your skin. I found it at Wal-Mart after searching stores like GNC and other health food stores because I knew it would be a lot cheaper at a drug  store. I’ve been using it consistently for 4 weeks now and I’ve noticed a big difference in my skin. My skin looks clearer, ive noticed that the blackheads I had on my nose have mostly gone away. When I do get a pimple I treat it right away with this and it clears up 90% faster than any other acne fighting treatment I’ve used. Don’t expect to see immediate results, it took about a month of using it everyday for me to notice the difference. There are a few different ways you can use this on your skin: 1. you can dab the affected areas onto your freshly washed face with a cotton swab before going to bed, then rinse your face when you wake up. 2. Pour a few drops of the oil into your favorite facial cleanser, mix together and wash your face as usual. 3. You can also use it as a toner, pour a few drops onto a cotton pad and gently wipe over your skin (or only the affected areas) after washing your face. Then rinse off well. 4. Use it as a spot treatment on a blemish, just dab it on the zit with a cotton swab. No need to rinse off. My favorite method is to mix it with my face cleanser and on the days I only exfoliate I will use it as a toner.

I should warn you about the odor. I wish someone warned me because it has a very strong medicine type of smell. (that’s the best way I can describe it). It’s by far a pleasant odor and the first time I used it I held my breath because it was so strong. Thankfully after a week of using it I got used to the smell and now it doesn’t even bother me. Also, if you have sensitive skin it can cause itchiness or irritation. Sensitive skin or not, I suggest testing a small amount on your skin to see how it reacts. If you feel its too strong or experience irritation don’t worry you can still use it, you just have to dilute it with water and that will help. Tea tree oil should never been taken internally and extra care should be taken when used around your eyes.

Tea tree oil is not only for acne, it can be used for a variety of different reasons. If you want to check out different ways on using tea tree oil check out this great site:


Suggested Retail Price $8.00 at Wal Mart stores nationwide or you can go to http://www.walmart.com and order it there.


Rimmel London Lasting Finish 25 hour Liquid Foundation


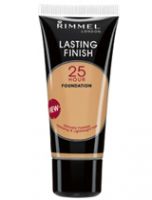
This is one of the best drug store foundations I’ve bought in a while. Like I’ve said before I tend to have normal to dry skin so I’m always looking for something that is hydrating or moisturizing. My makeup table is filled with all different brands and types of foundations bc I never found one that went on smoothly, didn’t dry up on my face or rub off in a hour. Until now, (thank the lord)! LOL..plus its not putting a dent in my wallet. This product does what it claims to. It promises that its sweat, heat and humidity proof (perfect for summer days)! It’s also enriched with a moisturizing Aqua Primer which must give it that hydrating feeling. I can’t say for a fact that it stays on for 25 hours bc I’ve never not washed my face for that long. (yuk)! but I can say I’ve had it on for at least 16 hours still going strong. I use my fingers to apply and it goes on flawlessly. It comes in 11 different shades, the lightest being Ivory and the darkest Natural Beige. I use Classic Beige. Overall I’m highly impressed with Rimmel and this product. 

Suggested Retail Price $7.99 found at your local drugstores.


Neutrogena Micro Mist Airbrush Sunless Tanning Spray


LOVE IT!!!!! My two words to describe this product. I’ve been to tanning salons and had the professional spray tans done and always turned orangey or with streaks. I’ve also bought a lot of different self tanning creams/sprays. I’m not going to lie, I am guilty of the occasional tanning bed sessions and laying by the pool or at the beach still. (I know, I know)! I’m not proud especially with all the cancer scares out there and the warning we here. However after using this product I’m probably going to think twice about going out in the sun now that I know I can get the same look without the risks. There are a few cons with this but I really think the pro’s outweigh the cons and here's why. CONS: okay, it doesn’t smell all fruity and yummy, but the smell is only there when you’re applying it, its not like you can smell it on your skin afterwards, you do have to pay attention when applying (but that goes for all spray tans) you have to spray in one even stroke (not a spray painting motion) or you will get streaks but its easy to avoid. Basically you have to follow the directions (which aren’t hard at all) to get the great results I’ve had (but that’s a given) . Okay now onto the PROS: it is oil free so you can apply it to your face by spraying some onto your hands and evenly applying it (you wont breakout)!, it has a one touch continuous spray that works on any angle to tan hard to reach places, the directions say you will see the color develop in 1-3 hours but I notice it less than a 1/2 hour therefore you don’t need to sit around for hours before putting your clothes on. I’ve sprayed it on my legs and put on pants 10 minutes later and there wasn’t any tan marks on my pants. Overall the few cons I think the pros outweigh the cons. They come in two different shades; medium tint and deep tint. I personally like the deep tint. Like I said it doesn’t turn you orange, its like you just came back from a tropical vacation.

Suggested Retail Price $10.99 found at your local drugstores or go to http://www.neutrogena.com/home.do to purchase it.


 Sally Hansen Grow Nails Now!


As far as getting my nails to grow I will always choose Sally Hansen’s Grow Nails Now. Not only do I love the clear gloss it gives to my nails it also truly makes your nails grow while strengthens my nails at the same time. Back in the day I would go to the nail salon and get those acrylic long nails put on and they looked good, until I got sick of them and decided to take them off. All I remember was my real nails being brittle, fragile and basically gross looking. I recommend any Sally Hansen nail growth or strength product, but this is my favorite. I would apply I to my nails every other day along with cuticle oil to help the growth. Not at all am I saying that your nails are going to grow instantly after one application but give it some time (not a lot) and you will notice the difference in your nail growth. Even though my nails are at a good length right now, I still apply this as a base coat (or top coat) just to prevent the breakage that could happen when using your hands and nails everyday. So, I find this product to not only help my nails grow but to also harden them and keep them healthy. If you're trying to grow your nails or prevent them from chipping or splitting you will like this.

Suggested Retail Price: $6.99 found at your local drugstores


7/04/2011

Summer Hair Trend: How to Get the Messy Side Braid

One of the hot summer trends this summer are the long messy side braids. It’s very easy to do and you can easily copy the look Audrina is wearing if you have long or medium hair. If your hair is on the shorter side you can always add extensions or those clip on pony tails, but don’t’ go overboard, remember you want it to look natural. Here’s how to copy the look:


1. You want some body so spray a dry shampoo onto roots while massaging your scalp.    This will give you the extra volume you want. If your still lacking volume slightly tease up near the hairline and on the sides. It’s okay if it doesn’t look perfect, its not supposed to.

2. Part your hair to the side and loosely gather hair and pull it all the way to the opposite side that you just made the part on.
Now begin braiding your hair, leave 2-3 inches of the hair at the end so the braid doesn’t look too skinny. 

3. Finish off with securing the braid with either a clear or black elastic or you can use a pretty ribbon.
If you have some large chunks of hair falling out (usually from shorter layers) secure them with a pin. But remember loose pieces can fall out and the braid isn’t supposed to look perfect. That’s the trick to getting this look.
Related Posts Plugin for WordPress, Blogger...