
Beauty Tip of the Week
I don’t know if you guys noticed or not but last Wednesday I didn’t post a beauty tip of the week. I know, I felt bad but I wanted to make it up to you this week by posting something more than just a beauty tip. I’ve been meaning to do a step by step on how I do my winged eye liner. So I figured I would use this beauty tip post to do that. I really hope my instructions make sense. It’s a little hard to write out, that’s why I included pictures to hopefully help.
I don’t know if you guys noticed or not but last Wednesday I didn’t post a beauty tip of the week. I know, I felt bad but I wanted to make it up to you this week by posting something more than just a beauty tip. I’ve been meaning to do a step by step on how I do my winged eye liner. So I figured I would use this beauty tip post to do that. I really hope my instructions make sense. It’s a little hard to write out, that’s why I included pictures to hopefully help.

Winged/Cat
eyeliner is one of those looks that can really bring your eyes out. This look
can give you the illusion of longer thicker lashes and can give you an instant
eye lift. But it’s a look that a lof of people struggle to achieve, either you
have a hard time keeping a straight line, getting the right angle or thickness
or getting both eyes to match. I was defineitly one of those people, I wanted
to be able to master this look so bad, I watched a ton of YouTube videos,
practiced with different brushes, types of eyeliners ect. Then finally one day
I was able to get it and then everytime after that I got better and better at
it and now I finally can say I mastered this beautiful look.


Since
there are so many different ways to create this look, Im just going to give you a step by step on how I create it. The way I do it is pretty simple, I tried to make it as easy as I could for you to understand.
STEP 1. First you want to apply your liner to the upper lash line, if you're going to use a brush then I recommend using the slanted brush with the bent tip thats in the picture above. It's perfect for applying an even line, all you have to do is hold the brush horizontally and follow the natural curve of your lash line. Start in the inner corner of eye and make short small lines and then go back and draw over the small lines. This will also ensure a straight line. I like to start off thin and gradually build up the thickness as I work my way to the outer corner of the eye.

Now you're going to want to focus on the wing. Looking straight in the
mirror imagine a similar line (like in the picture below) on your face that goes from the outer part
of your nose to the tip of your eyebrow. You can use a pencil or a brush handle to get a better sense of where
the line should be. In other words, imagine a line that follows the natural curve of your lower lash line. This lash line will be your guide to the wing of the eyeliner no matter how short or long you want it to be.

*If you don’t feel comftorable yet, try using the edge of
a business card and place it at the outer corner of your eye (where the
imaginary line would be) and use that as a guide. This is a great tip to ensure
the line is straight and in the direction you want.
STEP 2. I suggest using a
matte black shadow with a slanted eyeliner brush. It’s much easier to wipe off
eye shadow if you mess up then liquid liner. Lightly draw that line you
visualized from the picture above by starting from the outer corner of your lash line. If you’re going for a more subtle look keep
the line shorter, for a more dramatic look extend the line diagonally upwards
in the direction of the tip of your eyebrow.

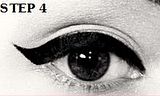
STEP 3. Now
to get the triangle that will be the wing shape, create a 2nd line
and start from your upper lash line that connects to the outer third part of your upper liner. It will blend right in *(See picture below if that didn’t make sense). You also want to experiment on how thick you want the wing to be. Draw
the 2nd line close to the first line and continue drawing it further
from the 1rst line until you get the desired thickness you want. You can make
it as thin or as thick as you would like. Each time you draw the 2nd
line again, make sure to look in the mirror to check the thickness. You should have something that looks like the picture below.

My favorite liquid liner is L’Oreal’s Lineur Instense Felt Tip Liquid Eyeliner and my favorite gel liner is Maybelline’s Eye Studio Gel liner. Those are the best drug store liners I have found that work just as good as any high end liner I've tried.
*If you feel like your lines need a little straigting out you can go back with a slanted eyeliner brush and the black eye shadow and set it. I do this almost everytime, also while you have the black shadow out with your brush you can line your bottom lashes for a smokey look. That’s totally optional.
Just remember practice really does make perfect with this! Once you get used to the placement of the wing you can skip drawing the outline in step 2 and just go for it with your liquid/gel liner. I hoped this help any of you that struggle with this look.
If you have any questions or comments please leave them!! J
Click the links below :)


This is a really useful post especially as I have only recently been trying out the winged liner look. It's taken me quite a bit of practice but these steps really help so I can get it right the first time. Normally I just "wing it". Excuse the bad pun. :p xo
ReplyDeleteGreat tutorial! Love using the business card tip!!
ReplyDeleteI've always struggled with winged eyeliner so this is really helpful, thanks :) x
ReplyDeletenew follower from the monday blog hop.
ReplyDeletehttp://www.sweettartbeauty.com
Thank you! I hope it helps a little. I know that a lot of it might not make sense. I wish I could film a video on how to do it. It would be a lot easier lol.
ReplyDeleteThanks doll!
ReplyDeleteI know, I love that tip!!
Thanks :) Im glad you find it helpful :)
ReplyDeleteThanks for reading!!!!
Great visuals! I love gel liner! Sigma also has a great liner brush that I swear by, it's the E05 brush :)
ReplyDeletewow! That is really a useful post! Thanks!
ReplyDeleteThis is a really nice tutorial. I do sometimes struggle getting a straight line - I quite like the using an edge of a card idea like a lil ruler. I will try it. :-) x
ReplyDeleteThanks :)) I've never heard of that brush but I love Sigma
ReplyDeleteThanks!! I'm glad you think so. I wasn't sure if it was too long or hard to understand.
ReplyDeleteThanks for the comment!
xoxo
Thank you!! Exactly, just like a ruler, let me know if you try it :)
ReplyDeleteThis is great Kelly. I love this look. You're right, it takes a lot of practice and the right tools or it can be hit or miss. My right eye always turns out better than the left one though. Maybe because I'm right handed. I have very tiny eyes and this look opens them up especially with the help of eyelashes as well. Thanks for sharing this.
ReplyDeleteThanks!!! That used to be my problem, where one eye would look different than the other. It was so aggravating.Then I realized what I was doing wrong.
ReplyDeleteIt's kinda like applying false eyelashes, I recently have been trying to use them but I feel like thats another hit or miss. I guess i need to keep on practicing
I definitely need to practice this. I do this but I never do it as think as in these pictures. I really like how this looks. Thanks for the help, but my advice is just use a slanted brush. That's what I use and it helps me the best to get a straight line. I got my brush from ACmoore only spent $2 on it, and it tops my mac slanted brush!
ReplyDeleteHi Kelly! I just gave your blog the Cute Blog Award! Check it out here- http://seventhingsbeauty.blogspot.com/2012/01/cute-blog-award.html
ReplyDeleteReally?? Aww!! Thank you so much!!!!
ReplyDeletexoxo
Eyes... are what certainly attracts one to another. From a guy`s perspective, I like a lady to accentuate her eyes and these are great tips. But if I may say so, less can be better.
ReplyDeleteYes, less can definitely be better in a lot of ways. I wouldn't say this style of eyeliner is too much though. It might be for you though.
ReplyDeleteI love winged eyeliner! I never fill it in like this - good tip! Came here from the blog hop, great review! x
ReplyDeleteYayy!! Im glad! Thanks doll!
ReplyDeleteGreat post! I will mos def try this when I get the chance.
ReplyDeleteThanks doll!! Hey, enter my giveaway if you have a chance :)
ReplyDeletexo
So out of the loop, lol. I'll find it though & be sure to enter
ReplyDeleteWow, awesome weblog layout! How lengthy have you ever been running a blog for? you make running a blog glance easy. The total glance of your website is magnificent, let alone as} the content!
ReplyDeleteMoto 360 Compass Chrome - Black Face